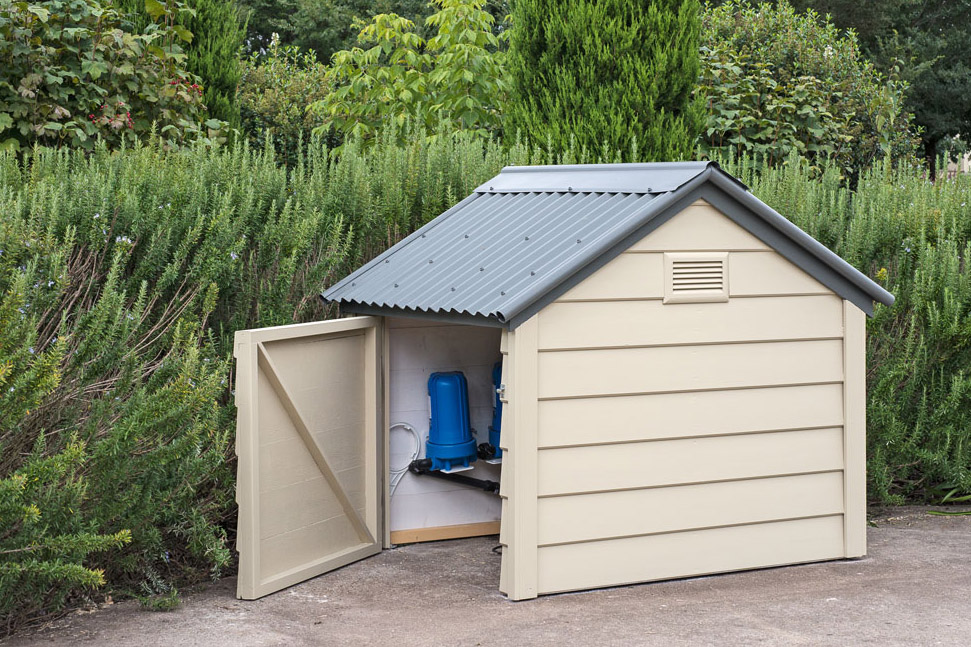
Build A Pool Pump Cover

Home backyard fixtures are best kept hidden, and the pool pump is no exception. This miniature house conceals the machinery and protects it from the elements, while still allowing easy access.
The dimensions can also be easily adapted to suit other items that you’d prefer to hide, such as wheelie bins or LPG cylinders. To build the stud walls and gable roof frames, use primed H3 treated pine, cutting the ridge end of the rafters and barges at 30º using a sliding compound mitresaw.
Since this is a small structure with only three pairs of rafters, there is no need to include a ridge board, just reinforce the rafter joints using collar ties cut from mending plates using a jigsaw with a metal cutting blade.
For the cladding, rebated Baltic pine weatherboards were ordered raw then primed before assembly, but to save time, you could buy primed H3 treated pine or manufactured boards such as Weathertex instead.
Use a nibbler or aviation shears to cut the galvanised corrugated roofing sheets to size, pairing them with tubular barge capping for a classic country look.
To finish, add the hardware and paint the pump house.
Add the Hardware
Once the pump house is bolted in position, use a 25mm chisel to cut housings for 100mm stainless steel butt hinges in
the doorjamb and side of the door. Secure the hinges and hang the door, then add a padbolt.
Cover the screw heads with exterior filler, leave to dry then sand lightly with 120 grit paper.
Apply metal primer to the galvanised roof followed by a metal paint. Finish the timber components with two coats of exterior acrylic.

Step 1. Erect wall frames
Use bugle screws to secure the studs between the base and top plates. Clamp the side frames between the front and back then secure with screws.
TIP The door-side frame comprises a pair of jambs and a top plate only, with no base plate.

Step 2. Prepare the rafters
Clamp a pair of rafters together in position and mark birdsmouth notches 20mm deep at the point where the rafters meet the top plates. Cut the first notch then clamp all six rafters with their ends flush to mark and cut the remaining notches

Step 3. Build the roof frame
Secure the pairs of rafters together using screws and cut-down mending plates as collar ties. Clamp purlins in between and secure with screws.
TIP Position the end purlins to rest against the top plates and plane off the corner flush with the rafters.

Step 4. Trim the rafters
Use a builder’s square to mark a plumb cut line on the rafter ends 40mm from the edge of the frame, and then use a jigsaw with its base plate set to 30º to trim the ends of the rafters. Secure the purlins to the top plates with screws.

Step 5. Secure the Cladding
Turn the structure on its side then, working from the base up, attach the cladding using screws. Mark the gable pieces directly from the rafter profile and cut them as you go.
TIP Make the small top piece of gable cladding from an offcut.

Step 6. Add barges & trim
Clamp the barges in position, overhanging the rafters by 18mm, then secure with treated pine screws. Mark and cut the front and back trim pieces to fit, using a cladding offcut to space the overhang.
TIP Don’t add the side trim pieces yet.

Step 7. Build the door frame
Clamp the stiles between the rails and secure with screws. Mark the diagonal brace directly from the door and cut to size, then secure from the top of the bolt side to the base of the hinge side. Clamp the door in position using shims to maintain even spacing.

Step 8. Clad the door
Attach cladding across the entire door side, securing the boards with screws both to the door structure and the jambs. Use a handsaw to cut the door free by sawing down the gaps.
TIP Start the cut before securing the uppermost board.

Step 9. Install the vent
Bore a starter hole in the lower gable using a drill with a 10mm twist bit, then use a jigsaw to make a cutout for the vent. Secure the vent using construction adhesive. Add the side trim then use a handsaw to cut the cladding flush with the barges.

Step 10. Add the tiedowns
Connect the internal corners of the walls to the roof frame with galvanised tiedowns. Attach the tiedown plates to the underside of the frame using bugle screws.
TIP You will need two left-twist and two right-twist tiedowns for the roof.

Step 11. Secure the capping
Attach the battens to the rafters using screws. Measure and mark the roll-top barge capping from the roof frame and use a hacksaw to cut it to size. Clamp the barge capping in position then secure it to the barges and rafters using roofing screws.

Step 12. Attach the roofing
Snap a chalkline to show the batten centrelines then use screws to secure the roofing sheets, overlapping them by one and a half corrugations. Add the ridge cap then use a masonry bit to drill 8mm diameter holes in
the slab to secure the frame.

Click on the diagram
Follow the labelled diagram to build the pool pump house. It has the name of all the parts and the measurements to help you cut the components and assemble the pump house.

Click on the cutting list
Follow the cutting list to build the pool pump house. It has the name of all the parts and the measurements to help you cut the components and assemble the pump house.
Vote It Up:

Points: 0

