Build A Rocking Horse

A new take on a traditional design brings this toy to life.
Kids love horses, and the opportunity to ride one is never missed. Suitable for ages one to three, this one is built from pine and painted in non-toxic acrylic gloss.
Templates
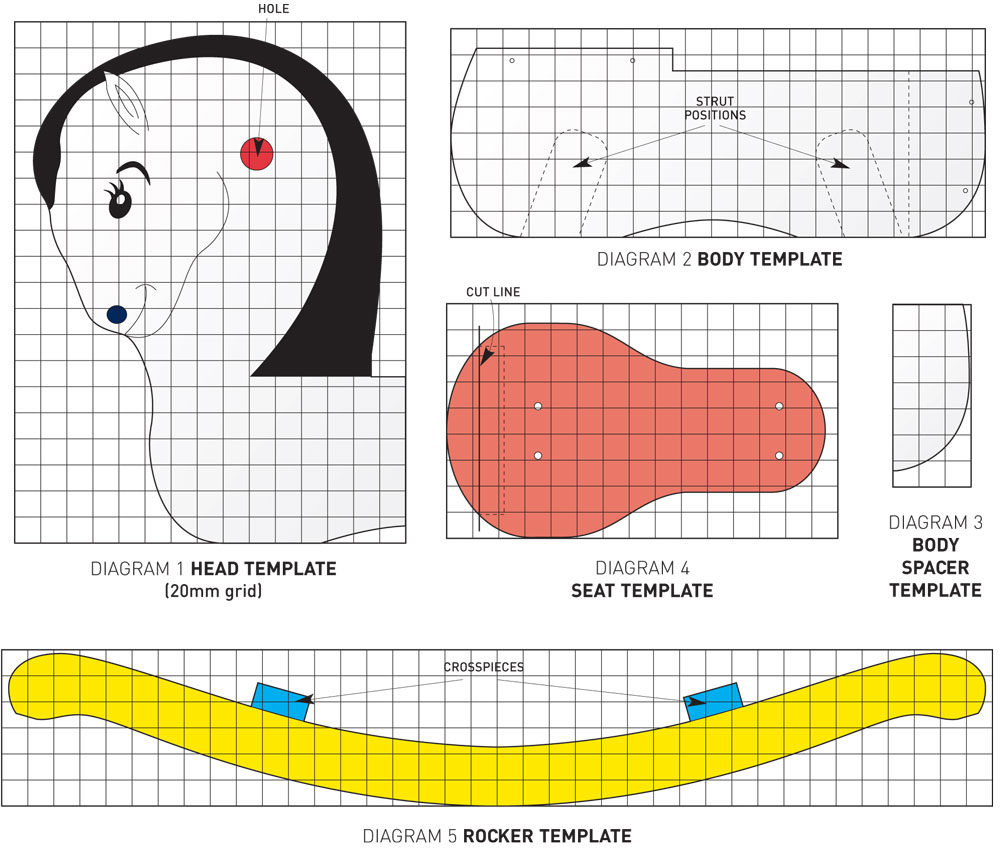
Here are the templates you will need to make this project correctly.


Step 1. Make the templates
Rule up a 20mm square grid on A4 paper. Photocopy four times and transfer the shapes (see Diagrams 1, 2, 3, 4 and 5). The head fits on one grid, the seat and struts on another. For the rockers and body, join two grids with a 20mm overlap

Step 2. Set up the templates
Cut out the templates and
tape each to a length of select-grade, knot-free pine and trace around each shape.
TIP Using a template keeps the doubled-up body parts, rockers
and struts identical.

Step 3. Cut out the parts
Clamp each part (except the crosspieces) and cut out using
a jigsaw with a narrow, sharp blade. Pre-drill a 25mm hole through the head for the handle. Sand the edges and surfaces with 100-grit paper. Cut struts and crosspieces to length.

Step 4. Cut the strut bases
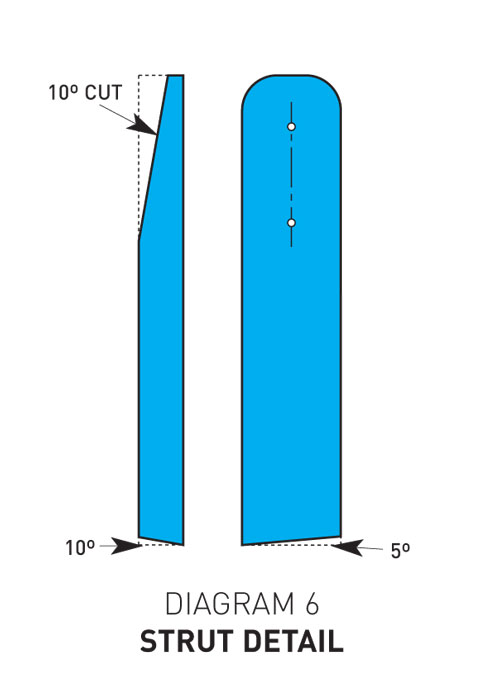
Set a sliding compound mitre saw baseplate to 5o on the right. Angle the blade 10o to the right and cut the base of two struts with the struts lying to the right of the blade, and two lying to the left.

Step 5. Cut the strut tops
Measure down 70mm from the top of each strut to square a line across one edge. Use a protractor to draw a line 10o from the 70mm mark to the top. Clamp and cut with a tenon saw. TIP Orientate the compound cut on the crosspiece for the correct angle.

Step 6. Paint the parts
Prime all the pieces then apply two coats of non-toxic acrylic gloss, lightly sanding between each with 240-grit abrasive paper.

Step 7. Join the head and body
Position the head, body and body spacer (see Diagram 7) on
a flat surface and align the edges. Mark screw positions and pre-drill 5mm clearance holes through the body and countersink holes. Fasten with 30mm x 8g screws.

Step 8. Join struts and crosspieces
Mark the position of the
struts on each crosspiece, pre-drill crosspiece then countersink from below. Position the front and rear struts, angling them to the centre of the horse. Fasten with 50mm x 8g screws from beneath the crosspieces.

Step 9. Attach the rockers
Pre-drill two 5mm clearance holes on ends of the crosspieces. Countersink holes and fasten crosspieces 190mm from rocker ends. Fix a 50mm x 8g screw into each crosspiece end, square the rocker by measuring diagonals and add other screws.

Step 10. Attach body to struts
Position the body between the struts so it is evenly spaced and level. Tighten both pairs of struts with a clamp at each end. Pre-drill and countersink the struts before fastening with 35mm x 8g screws.

Step 11. Add the seat
Cut the curved back end off the seat then fasten to the top of
the seat from below with glue and 30mm x 8g screws. On the seat, mark four screw holes over the centre of the body edges. Drill, countersink and fasten the seat with 50mm x 8g screws.

Step 12. To finish
Tap the 25mm dowel handle through the dowel hole in the head, with equal overhang on either side. Secure with a small panel pin angled through the head into the handle.

Click on the diagram
Click on the diagram to see each element of the rocking horse.

Click on the cutting list
Click on the cutting list to see what materials you will need for this project, and in what size.
Vote It Up:

Points: 0

